
How should you help keep your garden and food scraps in a closed loop system? What’s a natural way to fertilize your indoor and outdoor plants? Do your plants need an extra boost?
Try vermiculture or setting up a worm farm. Worms are highly beneficial for any garden – indoor or outdoor. Worm castings, vermicompost, or worm “poop” provide essential nutrients for healthy soil. Toss in select organic material – kitchen scraps and garden clippings to feed your worms.
What is a worm farm / vermiculture?
A worm farm, also known as vermiculture, is the practice of keeping worms to decompose organic material. A worm farm or vermiculture typically consists of a box and organic materials. The byproduct of a worm farm is nutrient rich soil or fertilizer. Worm farms and vermiculture are used as a method in gardening practices to compost organic material such as kitchen scraps, leaves, cardboard, and newspaper. The worms will naturally decompose the organic material into workable soil or fertilizer that you can then put back into your garden. The term vermiculture refers to the practice or speciality of keeping worms.
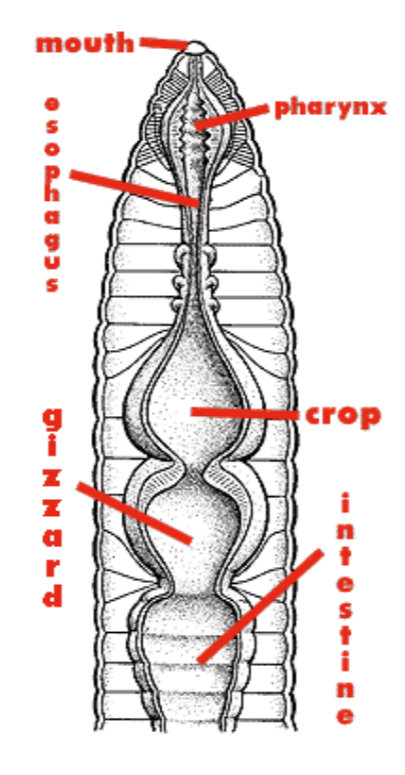
How do worms eat?
Worms eat and grind their food down by using their gizzard. After the food passes through the worms digestive system, any undigested material is excreted in the form of a worm “casting” or in lay-men terms, “poop!”
Why set up a worm farm / vermiculture?
Keeping a worm farm and practicing vermiculture has many benefits such as : amending soil nutrients, maintaining a closed loop and eco-friendly garden system, preventing plant diseases, and retaining soil moisture.
- Soil nutrients and Fertilizer
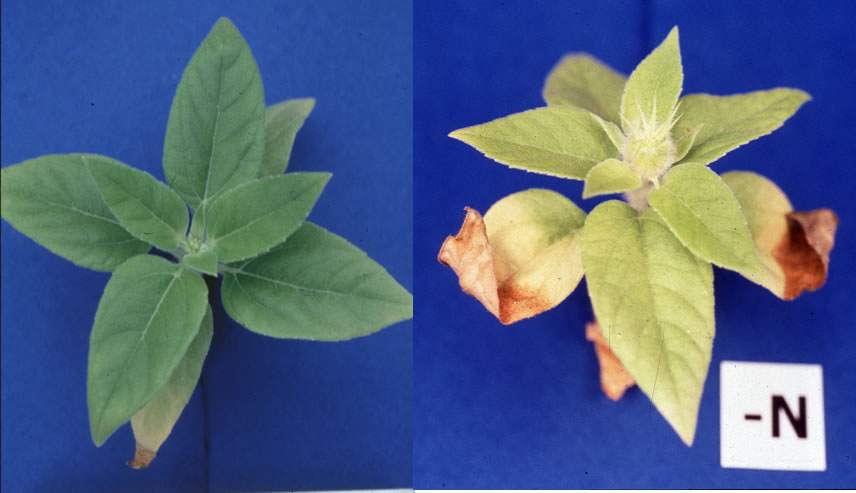
In any garden, worm “poop” or more commonly known in the gardening community as “castings” return essential nutrients back into your gardening soil. When used to amend your garden, worm castings provide minerals such as calcium, magnesium, nitrates, and phosphorus. Setting up a worm farm is a great way to get completely organic fertilizer for your garden. Worm castings contribute nitrogen to your soil. Nitrogen is a primary component of chlorophyll, the compound your plants will use to convert, using sunlight, water and carbon dioxide to sugars. This is a little process you may have heard of called photosynthesis! When plants don’t have enough nitrogen they will look weak as opposed to a plant with appropriate nitrogen will look robust and healthy.
- Eco-friendly & Closed Loop System
If you are striving to keep your garden a closed loop system, you should seriously consider keeping worms or taking up vermiculture. Like regular composting, a worm farm breaks down organic material scraps in to ready to use soil amendment and fertilizer.
- Disease Prevention
Worm castings can extract plant-harming fungi and bacteria from the soil. See this excellent article: Worm compost can suppress plant disease, regulate nutrients, research finds.
- Water and Moisture Retention
Humic acid, found in worm castings, helps retain soil moisture. Humic acid helps plants roots take on water and nutrients. When your soil is humic acid deficient, your plants can become malnourished. For more information see: How castings Help Drought
How do I set up my worm farm / vermiculture?
- Line the bottom of your first tray with 3 or 4 sheets of dry newspaper or moist cardboard. You only have to do this on your very FIRST tray.
- Place your coir brick in a bowl and pour about 2 cups of water. Let it soak until you can break it in half. Break up the coir but make sure it is not sopping wet.
- Mix the loose moist coir with pumice, rock dust and shredded paper. Place in tray.
- Add a few cups of compost or garden soil.
- Place a few handfuls of food and garden scraps in the tray.
- Select a thick section of newspaper or cardboard and soak and put on top your tray. When you feed your worms in the future, add it under this layer.
- Add 1 pound of worms. Make sure that you purchase red wiggler worms.
- Check on your worms after 2 days. Lift the newspaper/ cardboard to see if your worms are decomposing the food waste. If they are decomposing the food waste, add some more food and cover it with newspaper/ cardboard. If they have not eaten any of the original food, do not overfeed your worms.
Keep your worms moist
Keep your worms moist with mist, as necessary. Avoid directly spraying your worms because that may harm your worms. Moisture is essential to the worms functionality – worms are primarily made up of water. Worms can lose a lot of their body weight daily through castings. This is why it is common for you to see worms after a good rain.
Monitor your worms’ food intake
Temperature – keep temperature between 55 and 80 degrees.
To get the same worm farm I have find it by clicking here. It’s called the Worm Factory 360 WF360B Worm Composter, Black.
To see how I set up my worm farm check out this video:
How to use the worm poop / worm fertilizer / worm soil?
Move your finished tray to the top of your worm tower and remove the lid, allowing light to penetrate the tray. Worms have an aversion to light and will migrate down into the lower feeding tray. Using your hands, spoon, spatula or other gentle tool, move around the compost to expose more light and dry out the compost a bit. Worms want it to be dark and moist so they will move down to the lower tray. Repeat the process until the worms have completely migrated to the lower feeding tray.
Check the base of your collection area for any worms that may have fallen, and drain your worm farm.
Use worm compost as a fertilizer for your plants, evenly dispersing on top of your soil and mixing in gently in to the top layer of soil.
When do I start a new tray?
- Add food (see below on what to and what not to compost) to your worm tray until it is full.
- After you have left your compost alone, your first tray will be ready to use in about 3 months.
- When Tray 1 is full, add Tray 2. You don’t need to wait until Tray 1 is fully composted to start Tray 2.
- Start Tray 2 by adding some compostable material along the edges of the bottom tray to attract your worms to come up to the second tray. Fill the tray halfway with moistened shredded newspaper.
- Move the newspaper or cardboard cover from the top of Tray 1 to the top of Tray 2 bedding and food.
- It may take a couple weeks for your worms to migrate up to the second tray.
What can I put in my worm farm?
- Organic fruit and vegetable scraps (EXCEPT CITRUS, ONIONS, GARLIC unless in super small quantities)
- Coffee ground and filters
- Coffee grounds provide a nitrogen source for composting. Used coffee filters provide source in your compost.
- Tea and Tea bags
- First ensure that your tea bag is truly compostable. If not, just compost the tea leaves.
- Paper, Newspaper and Cardboard
- Moist newspapers and cardboard are what your worms live in instead of soil. Make sure you break up the newspaper and cardboard into small strips about ½ inch wide if possible. Soak before adding to your tray. Again, worms need moisture in order to function. The majority of their body is made up of water.
- Eggshells
- Crushed up eggshells when added in to your worm farm, compost, and/or vermiculture brings calcium into your soil. In your soil, calcium helps to maintain chemical balance in the soil, reduces soil salinity, and improves water penetration.
What should I not put in my worm farm?
- Citrus
- Meat, bones, fish, poultry eggs
- Dairy
- Fats / oils
- Salty food
- Non-organic matter or lawn clippings sprayed with pesticides
- Human or pet waste
- Coals
- Diseased plants
Troubleshooting
How much should I feed my worms?
Monitor their consumption daily. If you don’t feed your worms enough, they can eat their own castings which can be detrimental AND very poisonous.
What do I do if the worms aren’t taking to Tray 2?
This can take a while. If they aren’t taking to Tray 2 it may be because they don’t like what’s in Tray 2. Make sure that you didn’t add anything from the Do Not Compost list below.
The bedding seems too dry?
Add in wet compost / food scraps.
The bedding seems too wet?
Add in dry newspaper clippings, dry ripped up cardboard.
What are ideal temperatures for worms?
55 to 80 degrees. Keep your worms out of direct sunlight.
Some more useful tips for starting your first worm farm
- Refrigerate your compost. This makes a helpful solution for those that work 9-5! If you happen to be away from your compost, you can put your compost in a reusable container and fridge it until you get back to your worm farm. For some people, they are turned off at the idea of starting compost because it is stinky. Need not fear! This solution will keep your compost away from your nose. ALSO – compost shouldn’t ever smell foul. If it does something is up!
- The best time to start a worm farm is yesterday. Worm farms take up relatively little space but require some time to process in to ready to use compost. But, that’s what gardening is all about, right!? Patience.